
How to Start a Skool Community From Zero: A Complete Step-by-Step Guide (2026)
We started Morphios Lab with zero organic audience.
No existing following. No library of content. No established brand. No community waiting to join.
And we built the Skool community anyway.
This article documents exactly how we created it from scratch, including the Skool plan we chose, how we named and branded the community, how we made it discoverable, how we approached pricing and monetization, which plugins we enabled, and how we set up the first events and community rules.
We've built a successful Skool community before, but never in public. Ted and I built Legal English Academy from the ground up, and it now has more than 100 paying members and generates over $5,000 in monthly recurring revenue.
This time, we're doing things differently.
Instead of building quietly and only showing the results once everything works, we're documenting the process as it happens. You'll see the decisions we make, the experiments we run, what works, what doesn't, and what we learn while building Morphios Lab from zero.
If you're thinking about starting a Skool community without an existing audience, this is the process we're following.
Watch the Skool Community Setup
Before getting into the individual steps, you can watch the full 9-minute walkthrough below. We recorded the actual setup process so you can see what creating a Skool community looks like from start to finish.
The sections below break down each decision in more detail, including what we chose, why we chose it, and what we'd recommend if you're starting your own community.
Step 1: Choose Your Skool Plan
Which Skool plan should you choose when starting a community?
If you're starting from zero and don't have a product or significant revenue yet, the Hobby plan is the simplest place to start. You can upgrade to Pro later when you actually need its additional features.
Skool currently offers two plans.
Hobby: $9/month
The Hobby plan includes:
Unlimited members
Courses
Video
Livestreams
The main tradeoff is a 10% transaction fee on payments processed through Skool.
You also don't get a custom community URL, an affiliate program, or some of the additional Pro features.
Pro: $99/month
The Pro plan includes the same core features, but the transaction fee drops to 2.9%.
It also adds:
A custom link for your community
An affiliate program
Unlimited admins
Zapier integration
Meta Pixel tracking
The option to hide suggested communities
Webinars
Advanced analytics
Which plan did we choose?
We started Morphios Lab on Hobby.
At this stage, we don't have anything to sell through the community, so paying $99 per month for features we aren't using doesn't make sense.
Skool lets you upgrade later, so there's no need to commit to Pro before you actually need it.
Our approach is simple: start with the lowest-cost plan that gives you everything you need to validate the community. Upgrade when the business gives you a reason to.
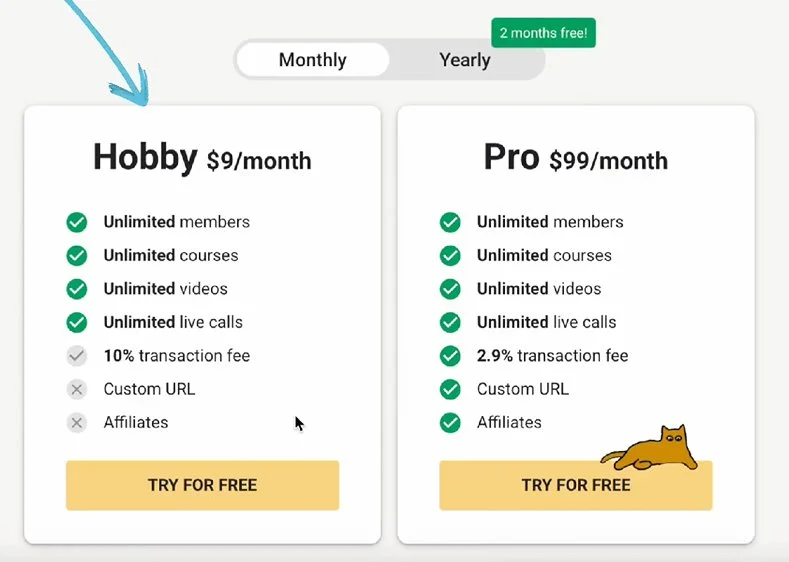
Skool pricing plans comparison layout showing the Hobby plan for 9 dollars per month and the Pro plan for 99 dollars per month, with key features listed for building a community from zero.
Step 2: Choose a Name for Your Skool Community
What should you name your Skool community?
Skool allows up to 30 characters for your community name, and you can change it later. That means you don't need to have the perfect name before you start.
We chose Morphios Lab.
The name reflects what we're building: a place where people can experiment with turning their skills, knowledge, professions, and interests into online communities and businesses.
If you're starting your own community, choose a name that is clear enough for people to understand what the community is about, but broad enough to give you room to grow. You can always refine it as the community develops.
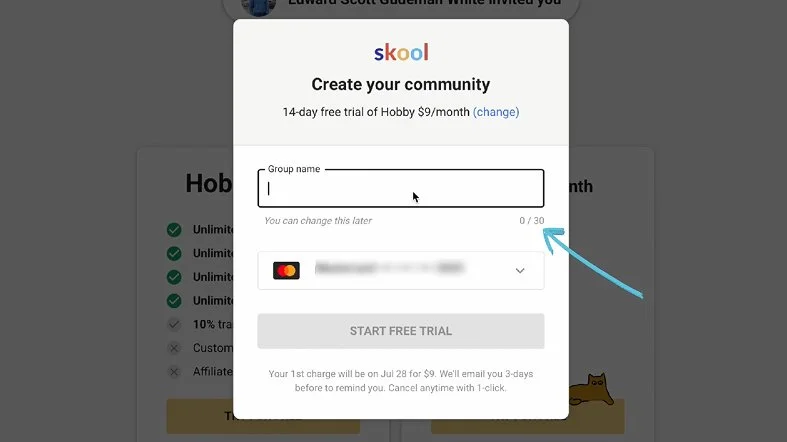
Skool community creation popup window showing the setup form for a 14-day free trial of the Hobby plan, featuring the group name field with a 30-character limit indicated by an arrow.
Step 3: Tell Skool How Large Your Audience Is
Do you need an existing audience to start a Skool community?
No. Skool asks about your current audience size during signup, but this is simply part of the onboarding process. You don't need an existing following to create a community.
The options are:
Under 10,000
10,000 to 100,000
100,000 to 1 million
Over 1 million
We selected under 10,000 because we're starting Morphios Lab with zero organic audience.
If you're starting from scratch too, select the option that accurately reflects your current audience. You don't need to have an established following before you start building a Skool community.
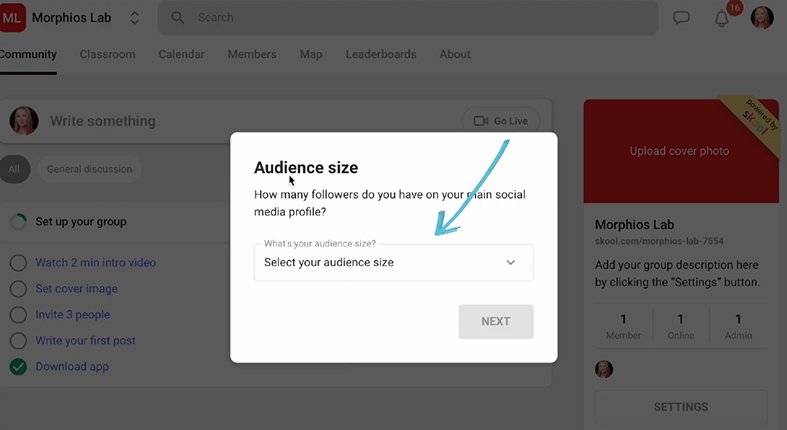
Skool group setup wizard popup prompting for audience size during the community onboarding process.
Step 4: Set Up Your Logo, Banner, and Community Description
What branding do you need for a Skool community?
Before configuring the rest of the community, we recommend setting up the basic branding so the page feels like a real community rather than an unfinished placeholder.
We created the Morphios Lab logo and banner ourselves in Figma using the basic design tools. You don't need advanced design skills or complicated plugins to create these assets.
Under General settings, Skool asks for two images:
Icon: 128 × 128 px
Cover: 1084 × 576 px
You'll also find a Group Description field with a 150-character limit.
We recommend putting the most important part of your description in the first 100 characters. That's the portion that is visible without expanding the description, so someone landing on your community should understand what it's about and who it's for immediately.
Think of the Group Description as your community's one-line pitch. Don't use the space just to describe what the community contains. Use it to make the value of joining clear.
Want to see exactly how we created the Morphios Lab logo and banner in Figma? Let us know in the comments and we'll cover the process in a future article.
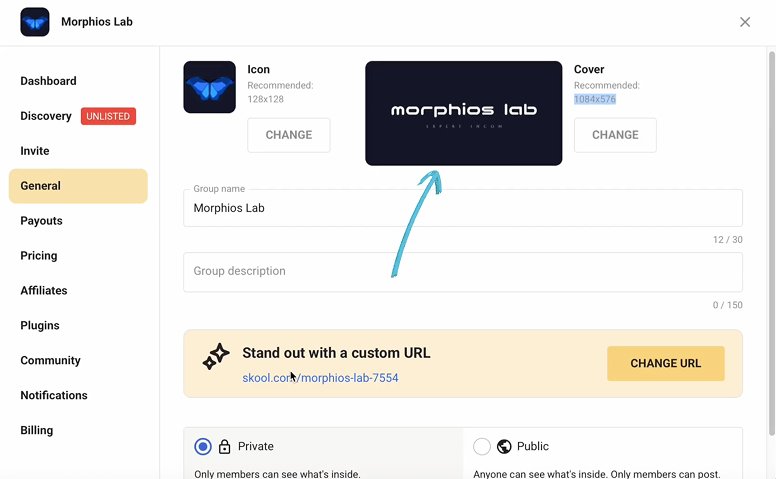
Skool general settings dashboard for Morphios Lab community, with an arrow pointing to the custom group cover image section, highlighting the 1084x576 recommended dimensions and the custom URL setup banner.
Step 5: Get Your Skool Community Listed and Discoverable
How do you get a new Skool community listed in Skool's discovery system?
New Skool communities start as unlisted, which means they won't appear in Skool's internal community discovery.
To become listed, Skool requires you to complete five things:
Set a cover image
Add a group description
Complete your About page
Publish your first post
Have three friends join the community
Once you've completed these requirements, your community can become discoverable through Skool.
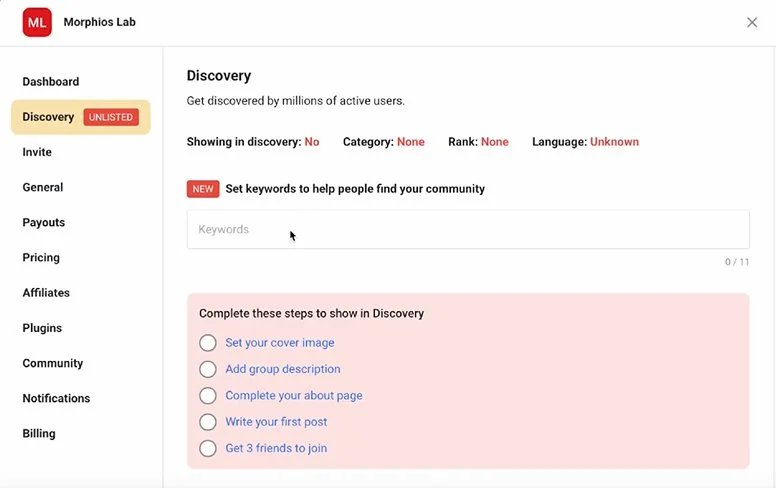
Skool community settings dashboard showing the Discovery page for Morphios Lab, featuring the group keywords input field and a checklist of required steps to list the community in public search.
Add Relevant Keywords
Skool also lets you add up to 11 keywords to help categorize your community and make it easier to find through relevant searches.
For Morphios Lab, we used:
Community building
Course creation
Online business
Solopreneur
Creator economy
Memberships
AI for business
Personal brand
Digital products
Digital services
We used 10 of the 11 available keyword slots.
The important thing here is relevance. Use keywords that accurately describe what your community is about and what potential members might actually search for. Don't add unrelated keywords just to fill every available space.
How Does Skool Community Ranking Work?
Skool is relatively transparent about the factors that influence community ranking and discovery.
According to Skool, factors that can help your ranking include:
Traffic you send to your community
Genuine member engagement
Payments processed through Skool
Being an active community owner
Factors that can hurt your ranking include:
Taking payments outside Skool
Bots or fake accounts
Spam
Low-quality engagement
Poor customer support
The important takeaway is that getting listed is only the first step. Being active and building genuine engagement is what gives your community a chance to become more visible over time.
For us, that means we're not treating Skool discovery as the main growth strategy. We're starting from zero and plan to bring people into Morphios Lab through our own content, including YouTube and this blog, while building the community itself in public.
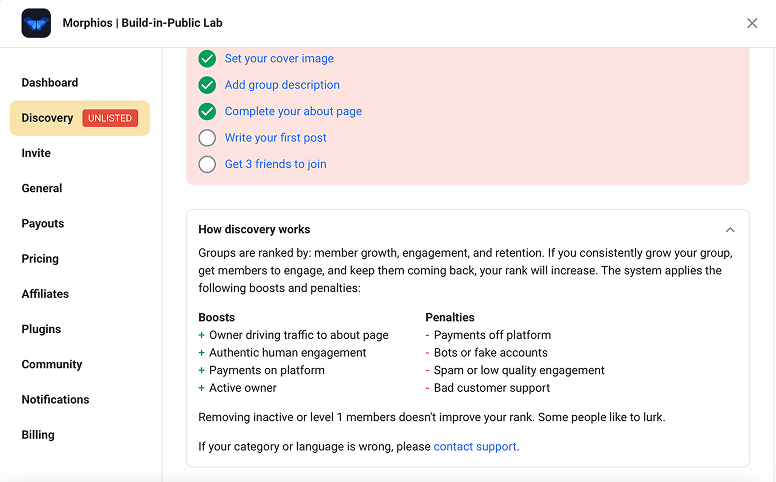
Skool Discovery settings page for Morphios | Build-in-Public Lab community, detailing the platform ranking algorithm with listed boosts for human engagement and penalties for off-platform payments.
Step 6: Choose How to Charge for Your Skool Community
How should you price a Skool community?
There isn't one pricing model that works for every community. Skool gives you five different ways to charge members, and the right choice depends on what you're actually offering, how much value the community provides, and whether you already have an audience or product.
This was also the part of the setup we spent the most time thinking about. We ended up cutting most of this discussion from the 9-minute video to keep it moving, but the decision is important enough to explain here.
1. Free
Members join without paying.
A free community can make sense when the community itself isn't the product yet, or when you're using the community to build an audience for another product or service.
This is also a reasonable starting point if you're building from zero and haven't figured out your paid offer yet.
2. Subscription
Members pay a recurring monthly fee, an annual fee, or both.
We initially tested:
$99/month
$999/year
When we entered the annual price, Skool indicated that a 16% discount is on the lower end of what members typically expect. A discount of around 20% is closer to the standard range if you want to make annual billing more attractive.
The advantage of subscriptions is predictable recurring revenue. The challenge is that you need to keep providing enough ongoing value for members to continue paying.
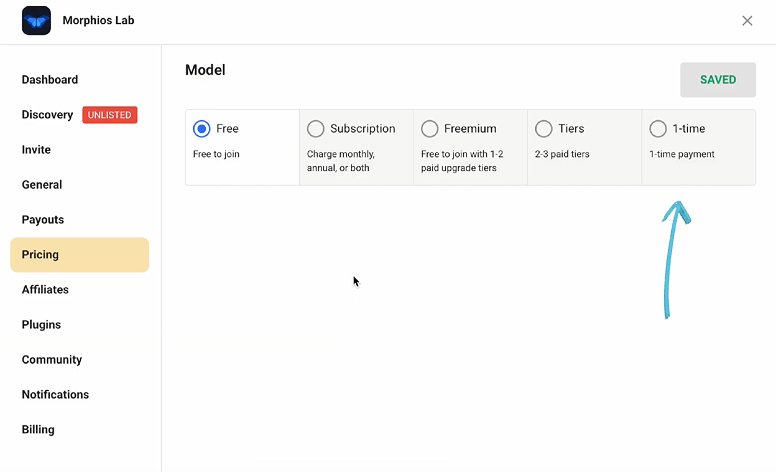
Skool community pricing settings dashboard showing community model options like Free, Subscription, Freemium, Tiers, and 1-time payment, with a blue arrow pointing to the one-time payment selection.
3. Freemium
Members can join a free tier and then upgrade to paid levels.
Skool calls these:
Standard
Premium
VIP
This model lets people experience the community before asking them to pay. The goal is to give free members enough value to understand the community while giving them clear reasons to upgrade.
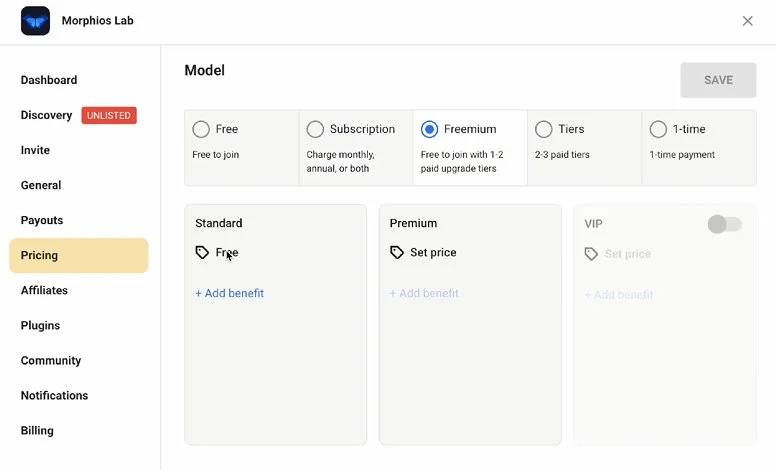
Skool community pricing settings dashboard with the Freemium model selected, displaying setup columns for Standard (Free), Premium (Set price), and VIP tiers with options to add member benefits.
4. Paid Tiers
You can also create two or three paid membership levels without offering a free option.
This can work when you want every member to have some financial commitment from the beginning.
For example, different tiers could provide different levels of access, support, content, or interaction.
5. One-Time Payment
Members pay once for lifetime access instead of paying a recurring fee.
This can make sense for a specific course, resource library, or other product where ongoing membership isn't necessary.
What Did We Choose?
We haven't locked in a monetization model for Morphios Lab yet.
That's intentional.
We don't have a course inside the community, and we don't fully know what the final offer will look like. Choosing a price before we know what we're selling would mean making an important business decision based on assumptions.
Instead, we're going to learn what people actually want from the community first.
If you're starting your own Skool community from zero, you don't necessarily need to choose your final pricing model on day one either. You can start free, keep the pricing flexible, and introduce a paid offer once you have real content, real members, and evidence of real demand.
The goal isn't to pick the perfect price at the beginning. The goal is to discover what people are willing to pay for.
Step 7: Choose the Skool Plugins You Actually Need
What Skool plugins should you use when starting a community?
Skool's Plugins section gives you additional tools for managing members, automating tasks, and connecting your community to other platforms. Some plugins are available on all plans, while others require Pro.
You don't need to activate everything when you start. We chose the plugins that made sense for Morphios Lab at this stage and will add others as the community grows.
Membership Questions
Free
Membership questions let you ask potential members for information before they join.
We added two questions:
What do you want to build or grow with Morphios Lab?
What's your email?
The first question helps us understand why people are joining and what they're hoping to accomplish. The email gives us a way to stay in touch outside the Skool community.
Unlock Chat at a Level
Free
This lets you require members to reach a specific activity level before they can send direct messages.
We see this as a simple way to reduce unwanted DMs from brand-new accounts. Members need to participate in the community before gaining access to direct messaging.
Unlock Posting at a Level
Free
You can also require members to reach a certain level before they can publish posts.
For example, you could require Level 2 or Level 3 before someone can create a post.
The idea is similar to the chat restriction: members have to participate first, which can help reduce low-effort posts and spam.
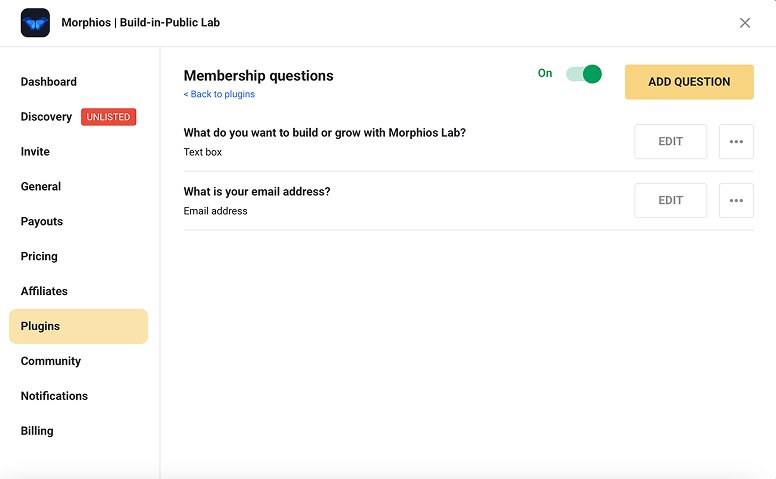
Skool community dashboard showing the Membership Questions plugin configuration for Morphios | Build-in-Public Lab, with a toggle turned on and custom intake questions for group onboarding.
Auto DM New Members
Pro
This automatically sends a welcome message when someone joins your community.
It's useful if you want every new member to receive the same onboarding message without having to send it manually.
Onboarding Video
Pro
The onboarding video gives new members a short introduction when they join.
This could be useful for explaining how the community works, where to start, what members should do first, or what they can expect from being part of the group.
Zapier Integration
Pro
Zapier connects Skool with other tools and can automate actions outside the community.
For example, you can use it to:
Invite members automatically
Unlock courses
Send membership-question responses to your CRM
Trigger actions in other connected applications
This becomes more useful as your community and marketing systems become more complex.
Meta Pixel
Pro
Meta Pixel tracking is useful if you plan to advertise your community through Facebook or Instagram.
It can help you track visitors to your About page, retarget people who have visited, and measure whether your advertising is generating signups.
Which Plugins Did We Use?
For Morphios Lab, we started with the free membership questions and activity-level restrictions.
We didn't need every automation or advertising feature on day one.
That's intentional. When you're building a community from zero, adding more tools doesn't automatically make the community better. Start with the features that solve an actual problem, then add complexity when you have a reason to.
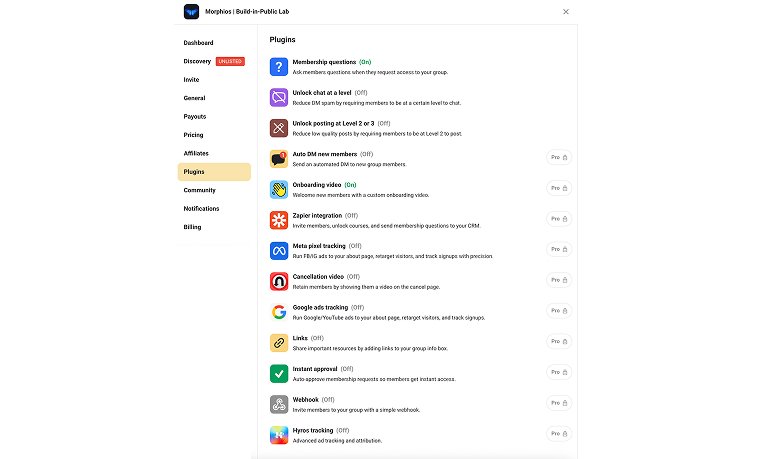
Skool Plugins dashboard page listing available group features and integrations, showing active plugins like Membership Questions and Onboarding Video, alongside locked premium Pro extensions.
Step 8: Set Up Your Community Structure, Categories, and Rules
How should you structure a new Skool community?
Once the basic setup is complete, it's time to decide how you want the community to work. Skool gives you a few simple tools to shape the member experience: tabs, categories, and rules.
We kept the structure intentionally simple. There's no point creating a complicated system before you have enough members and conversations to justify it.
Choose Your Community Tabs
Under the Community settings, you can turn different tabs on or off, including:
Classroom
Calendar
Map
We kept all three enabled.
You can always change this later, so the best approach is to enable the features you expect to use and remove anything that isn't relevant to your community.
Create Your Categories
Categories organize posts and prevent the community feed from becoming one long stream of unrelated conversations.
Skool starts with a General discussion category.
We added Announcements as a second category so important updates have their own place.
We're keeping the number of categories low for now. As the community grows and we see what members actually talk about, we'll add categories based on real conversations rather than trying to predict everything in advance.
Write Your Community Rules
Rules set expectations for how members should behave and what kind of community you're trying to create.
Our rules are intentionally simple:
Be positive
No self-promotion
Make an effort
Make money
The last one is deliberately direct.
Morphios Lab exists to help people turn their skills, knowledge, professions, and interests into online businesses. Making money is part of the reason people are here, so we wanted that goal to be explicit.
Your rules don't need to be complicated. They should make it clear what kind of behavior you want to encourage and what you don't want the community to become.
The goal is to create enough structure to guide the community without creating so many rules that the community feels restrictive.
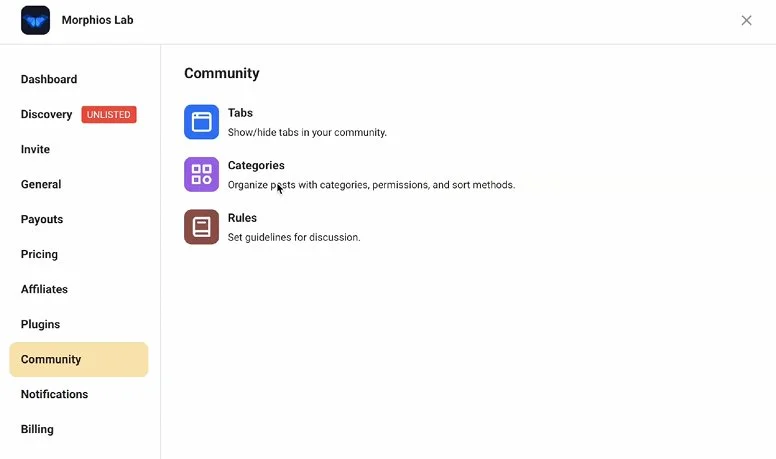
Skool Community settings panel for Morphios Lab, showing management options for structural elements including Tabs customization, forum Categories organization, and group Rules configuration.
Step 9: Create Your First Community Event
Should you create an event when your Skool community is brand new?
Yes. Even with only a few members, giving people a reason to show up can make a new community feel active and welcoming.
An empty calendar can make a community feel inactive before it has had a chance to grow. Skool gives you several event templates, including:
Coffee Hour
Q&A
Co-working Session
Happy Hour
Custom events
For Morphios Lab, we created a simple "Hang Out" call and scheduled it for the same day.
The goal wasn't to create an elaborate event or fill the calendar months in advance. We simply wanted to give the first members a reason to show up, meet each other, and talk about building an online business.
When you're starting from zero, you don't need a packed calendar. One real opportunity for people to interact is better than a calendar full of events nobody attends.
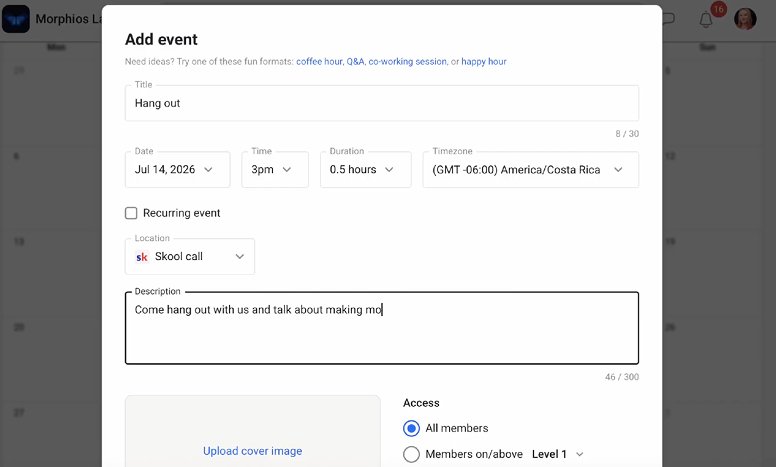
Skool group calendar Add Event popup window showing the setup form for a Hang Out session scheduled for July 14, 2026, in the America/Costa Rica timezone, with description input and member access levels.
The Result: Morphios Lab Is Live
After completing these steps, Morphios Lab was live and publicly discoverable.
We had:
A public Skool community
Our first members
A completed About page
A logo and banner
A clear community description
Community categories and rules
An active calendar
Our first event
What we didn't have was a finished course.
And that's the point.
We're not pretending Morphios Lab launched as a polished, finished product. We launched with the basic structure in place and started building from there.
The community is real, it's live, and we're building it in public from this point forward.
We'll document what happens next, including how we attract members, figure out what they actually want, develop the offer, decide what to charge, and test different ways to grow the community.
This is the beginning, not the finished product.
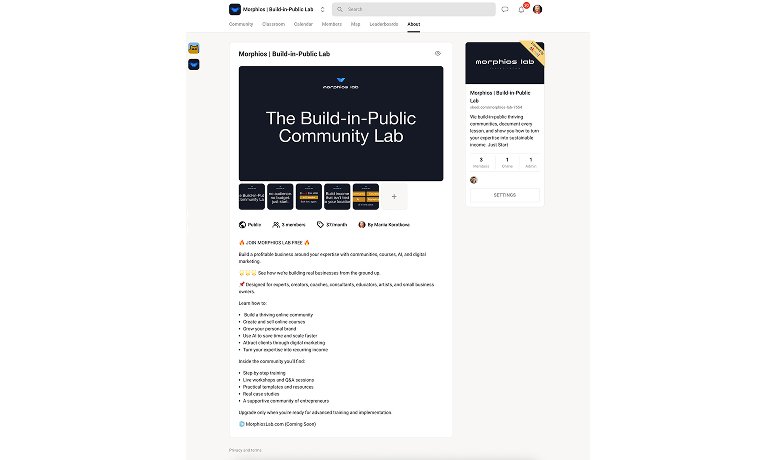
Skool public About page preview for Morphios | Build-in-Public Lab community, showcasing a sales landing page layout with video placeholders, pricing information, and a detailed bulleted group description.
Join Morphios Lab
We're building Morphios Lab completely in public, starting from zero.
If you want to be one of the first members, now is the time to join. There isn't a polished course or a finished business waiting for you. We're building the community, testing ideas, and figuring out what works alongside the people who join.
You'll get to see the process as it happens, participate in the early community, and help shape what Morphios Lab becomes.
Want to Build Your Own Community?
You don't need a perfect idea, a large audience, or years of experience to start building an online community.
A skill, profession, hobby, or area of expertise can be enough.
If you want to create your own Skool community, you can use the same process we walked through in this guide.
Skool Discover communities directory page layout featuring trending groups with pink arrows pointing to a custom mockup card that reads Here should be your community.
What's Next?
So far, we've shown you how we set up Morphios Lab from zero.
Next, we're going to show you what happened when we built a Skool community that already had to work.
In the next article, we're pulling back the curtain on Legal English Academy, the community Ted and I built together before Morphios Lab.
We'll share the real numbers, including what it earns, how it grew, what worked, what didn't, and what we'd do differently if we were starting again today.
No theory. Just the actual experience behind the numbers.
Key Takeaways
Building a Skool community doesn't require a large audience, a finished course, or a perfect business model.
We started Morphios Lab with zero organic audience and built the community from scratch. The most important lessons from the process so far are:
Start with what you actually need. We chose the Hobby plan because we didn't need the additional Pro features yet.
Don't wait for the perfect name or branding. Your community name can change, and basic branding is enough to get started.
You don't need an audience before you start. We had zero organic audience when we launched Morphios Lab.
Make your community easy to understand. Your name, description, About page, and branding should quickly communicate who the community is for and why someone should join.
Keep the initial structure simple. Start with a few useful categories, clear rules, and a reason for members to interact.
Don't force your pricing too early. We haven't finalized our monetization model because we want to understand the offer and member demand first.
Launch before everything is finished. Morphios Lab went live without a finished course. We're building the product and the community at the same time.
Document what happens. The real value of this experiment is not just showing the finished community. It's showing what happens while we build it from zero.
The biggest lesson is simple: you don't need to have everything figured out before you start. You need enough clarity to take the first step, then you can learn from what happens next.
Frequently Asked Questions
-
Yes. We started Morphios Lab with zero organic audience. You do not need an existing following to create a Skool community. You can start with a small group and build your audience alongside the community.
-
Skool currently offers Hobby and Pro plans. We started Morphios Lab on the Hobby plan because we were starting from zero and did not yet need the additional Pro features.
-
If you're starting a community without an existing product or significant revenue, the Hobby plan can be a sensible starting point. You can upgrade to Pro later when you need additional features and integrations.
-
New communities start as unlisted. Skool requires a cover image, group description, completed About page, first post, and three members before a community can become listed in its discovery system.
-
Skool supports several monetization models, including free communities, subscriptions, freemium communities, paid tiers, and one-time payments. The right model depends on what you're offering and what your members are willing to pay for.
-
No. We launched Morphios Lab without a finished course. The community, its members, and the offer can develop together. What matters is having a clear reason for people to join and participate.
-
Start with the basics: a clear description, professional branding, useful categories, simple rules, and a reason for members to interact. You don't need a huge library of content before you launch.
-
There isn't one method that works for every community. We're starting Morphios Lab by documenting the build publicly through YouTube, our blog, and the community itself. We'll continue documenting how we attract and retain members as the community grows.
